





How to Mount a Boat Seat Swivel: Complete Step-by-Step Installation Guide
A properly installed boat seat swivel is one of the most practical seating upgrades available for fishing boats, pontoons, cruisers, and offshore vessels alike. By allowing a seat to rotate through a full 360 degrees, a marine boat seat swivel dramatically improves comfort, casting access, and cabin flexibility — without requiring a seat replacement or structural modification. However, the quality of the installation matters as much as the product itself. A boat seat swivel that is incorrectly mounted will loosen under wave impact, develop dangerous play, or fail prematurely in a corrosive saltwater environment. This guide covers every stage of the process — from identifying the right swivel type to completing a thorough post-installation safety check — so boat owners, marine builders, and outfitters can achieve a solid, long-lasting mount the first time.
Key Takeaways
Most standard boat seat swivels use a 4-bolt mounting pattern with 70 mm (2-3/4") or 89 mm (3.5") bolt spacing — always verify against the product's technical drawing before drilling.
All fasteners used with a marine boat seat swivel must be AISI 316 marine-grade stainless steel to resist saltwater corrosion.
Marine-grade polyurethane sealant must be applied around every drilled deck penetration — skipping this step is the leading cause of hidden substrate damage.
Mounting a boat seat swivel typically takes 30–60 minutes with basic hand tools and no specialist trade skills.
A quality marine boat seat swivel should carry a rated load of at least 150 kg (330 lbs) for safe single-occupant use; heavy-duty models support 300 kg (660 lbs) or more.
A post-installation wobble test and lock engagement check are required before first use on open water.
What Is a Boat Seat Swivel and Why Does Correct Mounting Matter?
A boat seat swivel — also referred to as a marine seat turntable, swivel seat base, or rotating seat mount — is a mechanical plate assembly installed between a boat seat and its pedestal or floor bracket. Its purpose is to allow the seat to spin horizontally through a full 360 degrees, giving the occupant the freedom to face any direction without standing up or repositioning.
The internal structure of any marine boat seat swivel consists of four key components: a lower plate that bolts to the pedestal or deck surface; an upper plate that fastens to the seat underframe; a central bearing assembly — typically steel ball bearings or low-friction nylon glides — that enables smooth, even rotation; and a locking mechanism that secures the seat in fixed positions during travel or when load stability is required.
Correct mounting is critical in a marine environment because a boat seat swivel is subjected to continuous mechanical stress — repeated wave impact, shifting passenger weight, and engine vibration. The American Boat and Yacht Council (ABYC), the primary standards body for recreational marine systems in North America, specifies that seating hardware on recreational vessels must meet appropriate structural load and corrosion resistance requirements for the vessel's intended use. An incorrectly installed or under-torqued boat seat swivel will not meet those requirements and will deteriorate rapidly, particularly in saltwater.
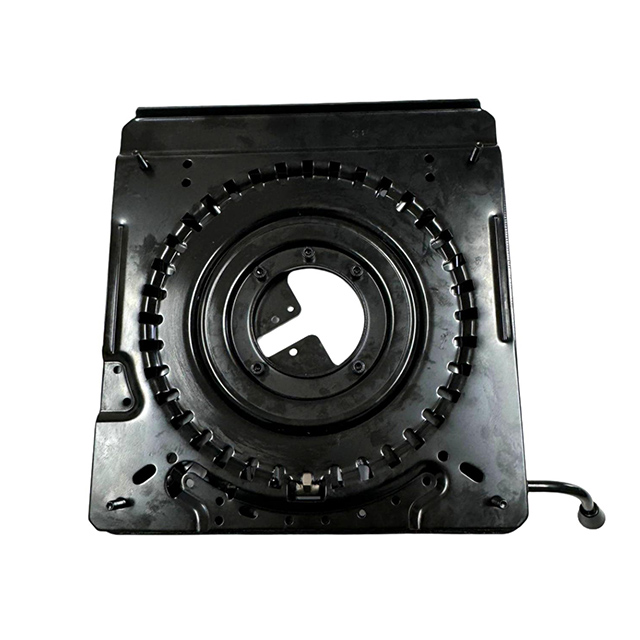
Types of Marine Boat Seat Swivels — and How Each Affects the Installation
Before beginning the mounting process, it is important to confirm which type of marine boat seat swivel is being installed, as the locking and bearing configuration has a minor bearing on assembly sequence and hardware selection.
Locking Swivels
The most widely used type for fishing and general recreational boating. A locking boat seat swivel allows free rotation when the release handle is engaged, then clicks firmly into position at set intervals — most commonly every 90° around the full circle, providing four locked positions. This design ensures the seat cannot spin unintentionally while the vessel is underway at speed. Locking swivels require no additional hardware during mounting but the release handle orientation should be confirmed before the lower plate is bolted down.
Free-Rotating Swivels
A free-rotating boat seat swivel provides continuous, unrestricted 360° rotation without fixed locking positions. This type is most common in social or lounge seating areas — stern decks, cabin seating, and pontoon boat conversational arrangements — where the vessel is typically at anchor or low speed and occupants rotate frequently. Mounting procedure is identical to a locking swivel, but there is no locking position to orient during installation.
Heavy-Duty Swivels
Engineered for captain's chairs, offshore fishing platforms, commercial fishing vessels, and any application requiring sustained high loads. A heavy-duty marine boat seat swivel uses thicker steel plate construction, larger-diameter bearing assemblies, and more robust locking pins compared to standard recreational units. These swivels typically have a larger bolt pattern with wider hole spacing, so the substrate backing plate requirement is more critical. Always verify the rated load specification before purchasing a heavy-duty swivel for a specific application.
Tools and Materials Required Before Mounting
Assembling the correct tools and hardware before starting the installation avoids interruptions and ensures compliance with marine hardware standards. The following checklist covers all items required to mount a boat seat swivel correctly.
Tools
Electric drill with 5/16" or 3/8" drill bit rated for fiberglass, aluminum, or steel (as applicable)
Torque wrench or socket set with correct drive size
Tape measure and permanent marker or pencil
Center punch and hammer (prevents drill bit wandering on smooth gel-coat or aluminum surfaces)
Degreaser or acetone (for surface cleaning prior to sealant application)
Safety glasses and gloves
Hardware and Consumables
Marine boat seat swivel — load rating and bolt pattern must match the seat and pedestal specifications
Marine-grade stainless steel bolts, AISI 316, 5/16" or 3/8" diameter × 1" length (confirm against plate thickness)
Stainless steel flat washers — for both the top and underside of the mounting surface
Nylon-insert lock nuts (nylock) — essential for vibration resistance in a marine environment
Marine-grade polyurethane sealant — applied to every deck penetration before bolting
Aluminum or stainless steel backing plate (1/4" minimum thickness) — required for fiberglass deck installations
Medium-strength threadlocker — optional, applied to bolt threads for additional vibration security
Step-by-Step: How to Mount a Boat Seat Swivel
The following steps describe the standard method for mounting a boat seat swivel onto an existing seat pedestal top plate or deck surface. For installations into fiberglass, a backing plate should be bonded or mechanically fastened to the underside of the deck before the bolts are tightened.
Clean the mounting surface. Wipe down the pedestal top or deck area with a degreaser and allow it to dry completely. Remove any old paint, residue, or cured sealant from previous hardware. A clean, dry surface is essential for both accurate hole marking and sealant adhesion.
Position and center the lower swivel plate. Place the lower plate of the boat seat swivel in its intended position. Most seat swivels have a directional reference marking — align this with the bow-facing direction of the seat. Confirm the plate sits flat with no rocking before marking holes.
Mark the bolt hole positions. Using a marker or pencil, trace through each of the four bolt holes in the lower plate onto the mounting surface. Lift the plate away and use a center punch and hammer to create a small indent at each mark — this prevents the drill bit from skating across the surface when drilling begins.
Drill the pilot holes. Drill vertically through each punched mark using the correct bit diameter for the chosen bolt size. When drilling fiberglass, use a sharp bit at moderate speed and avoid pressing hard — excessive force causes delamination and cracking around the hole. Apply cutting fluid when drilling aluminum. Deburr all holes after drilling.
Apply marine sealant around each hole. Apply a continuous bead of marine-grade polyurethane sealant around each drilled hole on the top mounting surface before placing the lower plate. This step is non-negotiable: every penetration through a boat's deck or pedestal is a potential water ingress point, and moisture trapped in wood-cored or foam-cored fiberglass causes progressive delamination and structural rot that is expensive to repair.
Fasten the lower swivel plate. Position the lower plate over the sealed holes and insert stainless steel bolts from the top. Place flat washers between the bolt head and the plate surface. From below, fit flat washers and nylon-insert lock nuts. Hand-tighten all four bolts evenly in a cross pattern before applying final torque. For 5/16" (M8) hardware, torque to 10–14 Nm (7–10 ft-lbs). For 3/8" (M10) hardware, torque to 22–28 Nm (16–21 ft-lbs). Do not overtighten on fiberglass without a backing plate — excessive clamping force crushes the laminate.
Attach the upper plate to the seat underframe. Invert the seat and rest it on a padded surface to avoid scratching. Position the upper swivel plate against the underside of the seat frame, mark and punch hole positions, drill, apply sealant (if the frame has hollow sections where moisture could collect), and bolt the upper plate securely using the same hardware and torque specification.
Assemble and seat the swivel mechanism. Join the upper and lower swivel assemblies according to the manufacturer's instructions. On most marine boat seat swivels, the upper bearing plate seats onto the lower plate with an audible click or positive engagement. Install all retention clips, center bolts, or securing rings specified by the manufacturer — these components prevent accidental disengagement of the two plates under lateral load.
Test rotation and locking function. Rotate the seat through the full 360° range and confirm movement is smooth and even with no grinding, binding, or lateral play. For locking-type boat seat swivels, verify that the lock engages positively at each position and cannot be rotated by applying firm sideways force when locked. Apply a small amount of marine-grade grease to the bearing race if specified by the manufacturer's instructions.
Marine Boat Seat Swivel Mounting Specification Reference
The table below summarizes standard mounting specifications across the main boat seat swivel categories. These figures represent typical industry values — always cross-reference with the specific product's technical drawing and load data sheet before drilling.
| Swivel Category | Typical Plate Size | Bolt Pattern (4-bolt square) | Bolt Size | Torque Range | Typical Rated Load |
|---|---|---|---|---|---|
| Compact / Light-Duty | ≤ 200 mm (8") | 70 mm (2-3/4") center spacing | 5/16" (M8) | 10–14 Nm | 120–180 kg (265–395 lbs) |
| Standard Marine | 200–250 mm (8"–10") | 89 mm (3.5") center spacing | 5/16"–3/8" (M8–M10) | 10–28 Nm | 180–250 kg (395–550 lbs) |
| Heavy-Duty / Captain's Chair | ≥ 250 mm (10") | 100 mm (4") center spacing | 3/8" (M10) | 22–28 Nm | 250–350+ kg (550–770+ lbs) |
Note: Torque values apply to clean, dry, unlubricated stainless steel fasteners with nylon-insert lock nuts. Always consult the swivel manufacturer's installation documentation for model-specific requirements.
Post-Installation Safety Checks
Installation of a boat seat swivel is not complete at the last tightened bolt. The following checks should be performed before the vessel returns to the water — particularly important for installations in saltwater environments or on vessels used for fishing, diving, or offshore cruising.
Re-torque check: After performing the first full rotation test, re-check all bolt torque values. Rotation can reveal fasteners that were not fully seated during installation.
Wobble test: Apply firm lateral and rearward pressure to the seat in the locked position. Zero perceptible movement at the swivel base is the acceptable result. Any wobble indicates a loose fastener, insufficient substrate support, or a worn locking component.
Lock engagement test: For locking-type marine boat seat swivels, the lock must prevent rotation under firm hand force when engaged. A springy or soft feel when locked indicates a worn or damaged locking pin and requires investigation before use.
Rotation clearance check: Rotate the seat through its full range and verify that the seat, armrests, and cushion assembly do not contact the gunwale, helm console, surrounding rails, or other fixed hardware at any rotational position.
Sealant cure period: Allow the marine polyurethane sealant to cure fully per the product's published cure time — typically 24–72 hours — before the vessel is put into water. Launching before the sealant has cured can allow water to reach the substrate through incompletely sealed holes.
For broader reference on marine hardware installation standards and boating safety practices, the West Marine technical resource library provides extensive guidance on marine hardware selection and installation that complements the steps outlined above.
Common Mounting Mistakes to Avoid
Using Non-Marine-Grade Hardware
One of the most frequent and costly errors when mounting a boat seat swivel is installing the unit with standard hardware-store zinc-plated or galvanized bolts and nuts. In saltwater, this grade of hardware can corrode and seize within a single season, making subsequent removal or maintenance extremely difficult and risking structural failure of the mount. Only AISI 316 stainless steel fasteners should be used when mounting any marine boat seat swivel.
Skipping Marine Sealant
Every hole drilled through a fiberglass, aluminum-framed, or composite boat surface must be properly sealed before the fastener is installed. Omitting sealant around the boat seat swivel mounting holes is a leading cause of hidden water damage — in foam-cored or wood-cored fiberglass construction, moisture trapped inside the core causes irreversible delamination and rot over time, resulting in deck repair costs that far outweigh the time saved by skipping sealant.
Selecting an Undersized Load Rating
Choosing a boat seat swivel with a rated load close to or below the weight of the likely occupant creates a genuine safety risk. The load rating should provide a meaningful safety margin above the maximum realistic use weight — occupant body weight plus the dynamic loading effect of wave movement and sudden directional changes. For any vessel used in rough water or offshore conditions, a heavy-duty marine boat seat swivel rated for at least 250 kg (550 lbs) is the more prudent choice for a single-occupant seat.
No Backing Plate on Fiberglass Decks
Bolting a boat seat swivel directly through a fiberglass deck without a backing plate concentrates all clamping force onto a small area of laminate that is not designed for point loading. Over time, this crushes the laminate, allows fasteners to pull through, and creates the very wobble and water ingress the installation was meant to prevent. A 1/4" aluminum or stainless plate bonded or fastened to the underside of the deck distributes load evenly and is considered best practice for any deck-penetrating marine hardware installation.
Incorrect Swivel Orientation
Many marine boat seat swivels have a defined forward-facing direction — particularly locking-type swivels where the lock positions are at 90° intervals relative to the swivel's neutral axis. Installing the lower plate at an incorrect rotational angle results in the lock positions not aligning with the intended fore-aft or athwartships directions. Always confirm the orientation reference mark on the lower plate before tightening bolts.
Sourcing a Reliable Marine Boat Seat Swivel Manufacturer?
For B2B procurement teams, boat builders, marine outfitters, and OEM product developers looking to source quality boat seat swivels at volume, choosing a manufacturer with verifiable engineering capability, material traceability, and proven load testing is essential. SANBO (Changzhou Sanbo Metal Products Co., Ltd.) is a factory-direct manufacturer of seat swivel mechanisms — including marine boat seat swivels, heavy-duty locking swivels, free-rotating bases, and fully custom OEM swivel plates — supplying global clients across the marine, RV, commercial vehicle, and industrial seating sectors.
SANBO's seat swivel products feature high-strength steel plate construction, precision ball bearing rotation, and robust locking pin mechanisms engineered for demanding, high-cycle use environments. Custom mounting patterns, load ratings, rotation angles, surface finishes, and dimensional specifications are available for OEM and ODM orders of all sizes.
Request a Free Quote from SANBO →Summary
Mounting a boat seat swivel correctly requires attention to three non-negotiable fundamentals: the right hardware specification — marine-grade stainless steel fasteners at the correct diameter and torque value; proper sealing of every deck penetration with marine polyurethane sealant to prevent water intrusion; and a thorough post-installation check — including a wobble test and lock engagement verification — before the vessel returns to service.
When these fundamentals are followed and a quality marine boat seat swivel is selected with an appropriate load rating for the application, the installation can be completed by any competent boat owner in under an hour and will deliver years of reliable, low-maintenance rotating seat performance. For procurement teams and boat builders sourcing boat seat swivels at scale, factory-direct manufacturers with load-tested products and custom engineering support represent the most efficient and cost-effective supply route.